
· 14 min read

What is Message Queue

Message Queue is a common communication pattern used in software architecture to enable asynchronous communication between system components. It allows one component of a system to send a message or task to another component, which may be running on a different server or in a different process or thread.

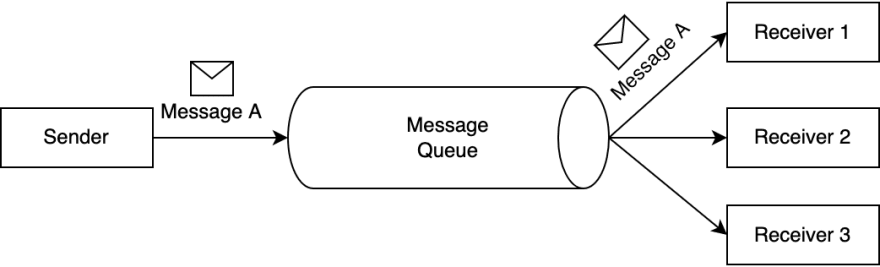
The message queue acts as a buffer between the sender and the receiver, holding messages until the receiver is ready to process them. This allows the sender to continue its work without waiting for the receiver to process the message immediately. When the receiver is ready, it can pull messages from the queue and process them.

message-queue

Message queues can be used for a variety of purposes, such as load balancing, task distribution, and decoupling components. They can be implemented in many different ways, such as using in-memory data structures or external message brokers like RabbitMQ or Apache Kafka.

The following blog articles will help you focus on the *message queues most suitable for cloud-native applications in 2023. The first three are currently the most influential message queues, and the last four are the latest and most popular next-generation message queues in the past two years

  • Apache Kafka
  • RabbitMQ
  • Pulsar
  • Nats
  • Redpanda
  • Vanus
  • KubeMQ
  • Memphis

4 of the most well-known open source message queues

If you want to understand a piece of software deeply, you may want to pay attention to its birth background. To understand a person's character, one needs to know his family, because the family determines a person's genes. Similarly, if you want to understand a message queue, you may want to pay attention to the background of its birth, because the background will determine the DNA of a message queue.

If you take the time to sort out the history of message queues, you will find a very interesting phenomenon. Most of the currently popular message queues were born around 2010. For example, Apache Kafka was born at LinkedIn in 2010, Derek Collison developed Nats in 2010, and Apache Pulsar was born at Yahoo in 2012. What is the reason for this?

There are roughly three applications that make 2010 the era of the birth of message queues:

  • Development of internet technology: Around 2010, thanks to the rapid development of the mobile Internet, users of Internet applications experienced explosive growth. In 2008 Facebook had only 50 million users, and in 2010 it had 545 million users. Also, in 2008, LinkedIn had 23 million users, compared to 161 million in 2011. With the rapid increase in users, people increasingly need to process a large amount of real-time data streams, which greatly promotes the rapid development of Internet technology. As these demands cannot be met by traditional means of data transmission, storage, and processing, there is a need for new solutions. Message queuing technology has also been greatly developed in this context.

  • Popularity of distributed systems: Distributed systems became increasingly popular around 2010, and distributed systems need an efficient, scalable, and reliable way to deliver messages. Message middleware was born to meet these needs.

  • The Rise of Open Source Software: Around 2010, open-source software became increasingly popular. Open source software allows developers to use, modify and distribute the code freely, so many developers build their own solutions and share them with other developers. Kafka, Pulsar, and NATS are all open-source software so they can be widely used and improved easily.

  • The Rise of Cloud Computing: Around 2010, cloud computing became increasingly popular. Cloud computing needs an efficient, scalable, and reliable message delivery mechanism, which also promotes the development of message middleware.

The following is an introduction to the currently well-known open-source message queues:

1 Apache Kafka

Apache Kafka is a distributed streaming platform designed to handle high volumes of data in real time. It was originally developed by LinkedIn in 2010 and later became an open-source project under the Apache Software Foundation in 2011.

Kafka is a publish-subscribe messaging system that enables applications to send and receive large amounts of data in real time, using a message broker architecture. It provides a fast, scalable, and fault-tolerant way to process and store data streams.

Kafka is commonly used for a variety of use cases such as:

  • Real-time data processing: Kafka can be used to process and analyze large volumes of data in real time, making it useful for use cases such as fraud detection, stock trading, and online advertising.
  • Log aggregation: Kafka can collect logs from various sources and store them in a central location, making it easier to manage and analyze logs.
  • Event streaming: Kafka can stream events such as clicks, searches, and user interactions to various applications for real-time processing.

There is no doubt that Kafka is the most influential message queue today. It has become the de facto standard for significant data transmission, and 80% of the Fortune 100 are using Kafka; Kafka is often used with other tools in the extensive data ecosystem, such as Apache Spark, Apache Flink, and Apache Storm, for data processing and analysis.

2 RabbitMQ

RabbitMQ is an open-source message broker software that allows applications to communicate with each other using a messaging protocol. It was developed by Rabbit Technologies and first released in 2007, which was later acquired by VMware.RabbitMQ is based on the Advanced Message Queuing Protocol (AMQP) and provides a reliable, scalable, and interoperable messaging system.

With RabbitMQ, applications can send and receive messages from other applications or services. It can handle various types of messages, including text, binary data, and JSON, and provides message queuing, routing, and persistence features. RabbitMQ also supports multiple messaging protocols and has various plugins extending its functionality.

RabbitMQ is one of the most popular Message Queue today. It is widely used in enterprise applications, cloud-based systems, and distributed systems, where different components need to communicate with each other asynchronously. It provides a reliable and efficient way to pass messages between applications and services, making it a popular choice for many organizations.

3 Nats

NATS is an open-source, high-performance messaging system for distributed systems, cloud-native applications, and microservices architectures. Derek Collison initially developed it in 2010. Derek Collison started developing NATS while working as the CTO of Apcera, a cloud computing company.

NATS provides a lightweight and efficient messaging protocol for communication between different applications and services. It has a client-server architecture and supports various messaging patterns, including point-to-point, request-reply, and publish-subscribe.

NATS is designed to be simple and easy to use, with a small footprint and low latency. It is often used in cloud-native environments to connect different components of a distributed system or to enable communication between microservices. NATS also supports message persistence, security, and clustering, making it a robust messaging system for building scalable and resilient applications.

4 Apache Pulsar

Apache Pulsar is an open-source distributed pub-sub messaging system originally developed by Yahoo. It was born in 2012, and its original purpose was to replace other message systems within Yahoo and build a messaging platform with a unified logical large cluster.

Pulsar supports multiple messaging patterns, including publish-subscribe and message queuing, and provides a rich set of features, including:

  • Multi-tenancy: Pulsar allows multiple applications to share a single cluster, with each application isolated.
  • Geo-replication: Pulsar can replicate data across multiple clusters in different geographic regions, providing high availability and disaster recovery capabilities.
  • Message TTL: Pulsar allows messages to expire automatically after a certain amount of time, which can be useful for implementing time-based workflows or cleaning up old data.
  • Tiered storage: Pulsar can store messages in multiple storage tiers, ranging from high-performance storage to cold storage, which can help reduce costs and improve performance.

Pulsar also provides a rich set of client libraries for various programming languages, making it easy to build messaging and streaming applications using Pulsar. Apache Pulsar is a popular choice for real-time data processing and messaging in large-scale data processing applications, such as those used in the financial, telecommunications, and internet-of-things industries.

Like 2010, 2020 is also a very important year. Let's take a look at some background information around 2020:

  • Cloud becomes the infrastructure of society: Digitalization has become an important driving force driving the development of enterprises. More and more enterprises choose to build their digital business based on the public cloud. In the 10 years from 2010 to 2020, the global cloud computing market size ranged from $41 billion to $312 billion. Even during the epidemic, the market growth rate in 2020 will still be as high as 33%.
  • Global economy enters recession: Although we don't want to see it, we must admit that it is now in a massive recession. The spread of the epidemic worldwide is one of the most important reasons. The recession has made business extremely difficult. Saving costs has become an important topic for many business executives.
  • Cloud native is becoming increasingly popular: Modern enterprises demand better agility, flexibility, and lower costs from their digital businesses. This has given birth to the rapid development of cloud-native technology. For example, C I/CD technology can provide the ability of rapid delivery, and Serverless technology can provide the ability of fast elasticity and on-demand operation.
  • Kubernetes is becoming the infra of cloud-native apps: Kubernetes provides a powerful ability to automatically expand and shrink applications and dynamically adjust resources according to the load of the application, thereby achieving higher resource utilization and faster application response time.his helps enterprises save costs and improve efficiency, so more and more enterprises deploy their software on k8s.

Around 2010, due to the surge of mobile Internet users, a large amount of data needed to be processed, which gave birth to the emergence of message queues such as Kafka. In 2020, due to the large number of cloud technologies adopted by enterprises and the emergence of cloud-native technologies such as Kubernetes and serverless, enterprises have new needs. This time, they need a message queue with a cloud-native architecture that is truly suitable for the new infrastructure. However, message queues, which were born around 2010, are obviously powerless in the face of new infrastructure and new applications, such as serverless due to different technical architectures and application scenarios. For example, Kafka obviously has many problems running on Kubernetes:

  • StatefulSet requirement: Kafka is a distributed system that requires each node to maintain its state, which can make it difficult to run on Kubernetes. In particular, running Kafka on Kubernetes requires using StatefulSets, which can be more complex to manage than Deployments.

  • Resource consumption: Kafka requires significant resources to run, including CPU, memory, and storage. This can make it challenging to run Kafka in a scalable way on Kubernetes, where resources are typically shared among many different applications.

  • Networking complexity: Kafka requires a well-defined network topology in order to work correctly, and this cannot be easy to achieve on Kubernetes. In particular, Kafka requires that each node have a unique hostname and IP address, which can be challenging to achieve in a containerized environment.

  • Data locality: Kafka performs best when data is stored on the same node as the consumer that will be reading it. However, Kubernetes does not provide strong guarantees about where pods are scheduled, which can make it challenging to ensure that data is stored on the same node as the consumer.

Different from virtual machines and traditional microservice architecture applications, new infrastructure such as k8s and cloud-native applications such as serverless have significantly different requirements for message queues:

Fully elastic: It can make full use of the capabilities of Kubernetes and automatically expand or contract as needed. Kafka can only be expanded or contracted manually, and data migration for replication is required.

Lightweight & K8s native: It needs to be lightweight enough, with very little resource dependence, and can run in pods.

Friendly to serverless cloud-native applications: Cloud-native applications, such as cloud functions, usually have strong elasticity. When traffic comes, hundreds of instances may need to be expanded to process requests within 1 second. The new message queue needs to support the rapid scaling of large-scale applications.

The following introduces four popular message queues born around 2020. Compared with Kafka, they are more suitable for k8s and new cloud-native applications.

1 Redpanda

Redpanda is an open-source distributed streaming platform that can be used as a high-performance message queue. Redpanda message queue is based on Apache Kafka's design but provides several improvements, such as faster performance, lower latency, and better scalability.

Redpanda message queue allows multiple producers to write messages to a single topic, and multiple consumers to read messages from that topic in parallel. Messages can be buffered in memory for fast delivery and persist to disk for durability. Redpanda also provides a number of features, such as replication, partitioning, and compression, to help manage large amounts of data.

One of the key benefits of using Redpanda message queue is its ability to handle large volumes of data in real-time. This makes it a popular choice for applications that require high throughputs and low latency, such as streaming analytics, real-time monitoring, and online gaming.

Overall, Redpanda message queue is a powerful and flexible tool for building real-time streaming applications that require reliable and high-performance message processing.

2 Vanus

Vanus is an open-source serverless event streaming platform with built-in event processing capabilities. It connects SaaS, cloud services, and databases to help users build next-generation event-driven applications. Vanus separates storage and computing resources and offers modern development features such as CloudEvents Specification, FaaS Integration, built-in Connectors, data filtering, and transformation.

  • Build the event-driven application

    • Send SaaS-generated events to the data lake for analysis.

    • Deliver cloud services events to cloud functions for processing.

    • Real-time transmission of events between SaaS.

    • Synchronize data between databases in real-time.

  • Out-of-the-box event computing capabilities

    • Provides 100+ built-in functions to help developers process events in real-time.
    • Provides general and flexible filtering rules, and developers can easily filter events.
    • Supports event processing through cloud functions such as aws lambda.
  • Serverless, a simple and effortless process

    • Automatically scale up or down clusters based on event traffic, reducing costs by up to 90%.
    • Seamlessly integrate mainstream cloud functions and open-source FaaS platforms.
    • One-click deployment, the installation is done in seconds with 0 operations needed.

3 KubeMQ

KubeMQ is a Kubernetes-native message queue and messaging system providing a reliable, scalable, high-performance messaging infrastructure for distributed applications. It is designed to be easy to deploy, operate, and use within a Kubernetes environment.

KubeMQ is built as a set of microservices that can be deployed as containers on a Kubernetes cluster. It includes features such as message queuing, publish/subscribe messaging, request/reply messaging, and event-driven messaging. KubeMQ also supports multiple messaging protocols, including REST, gRPC, and WebSocket, and provides client libraries for several programming languages, including Go, Java, Python, and .NET.

One of the key benefits of KubeMQ is that it is designed to be highly available and fault-tolerant. It includes features such as automatic sharding, data replication, and data backup and recovery, which help to ensure that messages are reliably delivered even in the event of node failures or network disruptions.

KubeMQ is also designed to be scalable, allowing users to add or remove nodes from the cluster as needed to handle changing message volumes or application requirements. Additionally, it provides monitoring and analytics capabilities that allow users to track message flow, monitor system health, and troubleshoot issues.

KubeMQ is a powerful and flexible messaging system that is well-suited for distributed applications running in a Kubernetes environment.

4 Memphis

Memphis is an open-source, cloud-native message queue and streaming platform. It is designed to provide a reliable and scalable messaging infrastructure for distributed applications. Memphis can be deployed on Kubernetes, and it supports multiple messaging patterns, including publish/subscribe, request/reply, and stream processing.

Memphis is built using Rust, which is known for its performance, reliability, and safety. The platform uses a distributed architecture, which allows for horizontal scaling and high availability. It also includes features such as message persistence, message filtering, and message batching, which help to ensure that messages are reliably delivered and processed.

One of the key benefits of Memphis is its simplicity and ease of use. It provides a simple and intuitive API that can be used with several programming languages, including Rust, Python, and Java. Additionally, it includes a web-based management console that allows users to monitor message traffic, view statistics, and manage the messaging infrastructure.

· 3 min read

Overview

Billings from cloud vendors allow users to observe the cost of resource.

Vanus obtains bills by using api from various cloud vendors. It uses Elasticsearch for data storage to achieve unified management of bills. It also notifies the team of abnormal expenses via like Slack Channel. aws-billing 
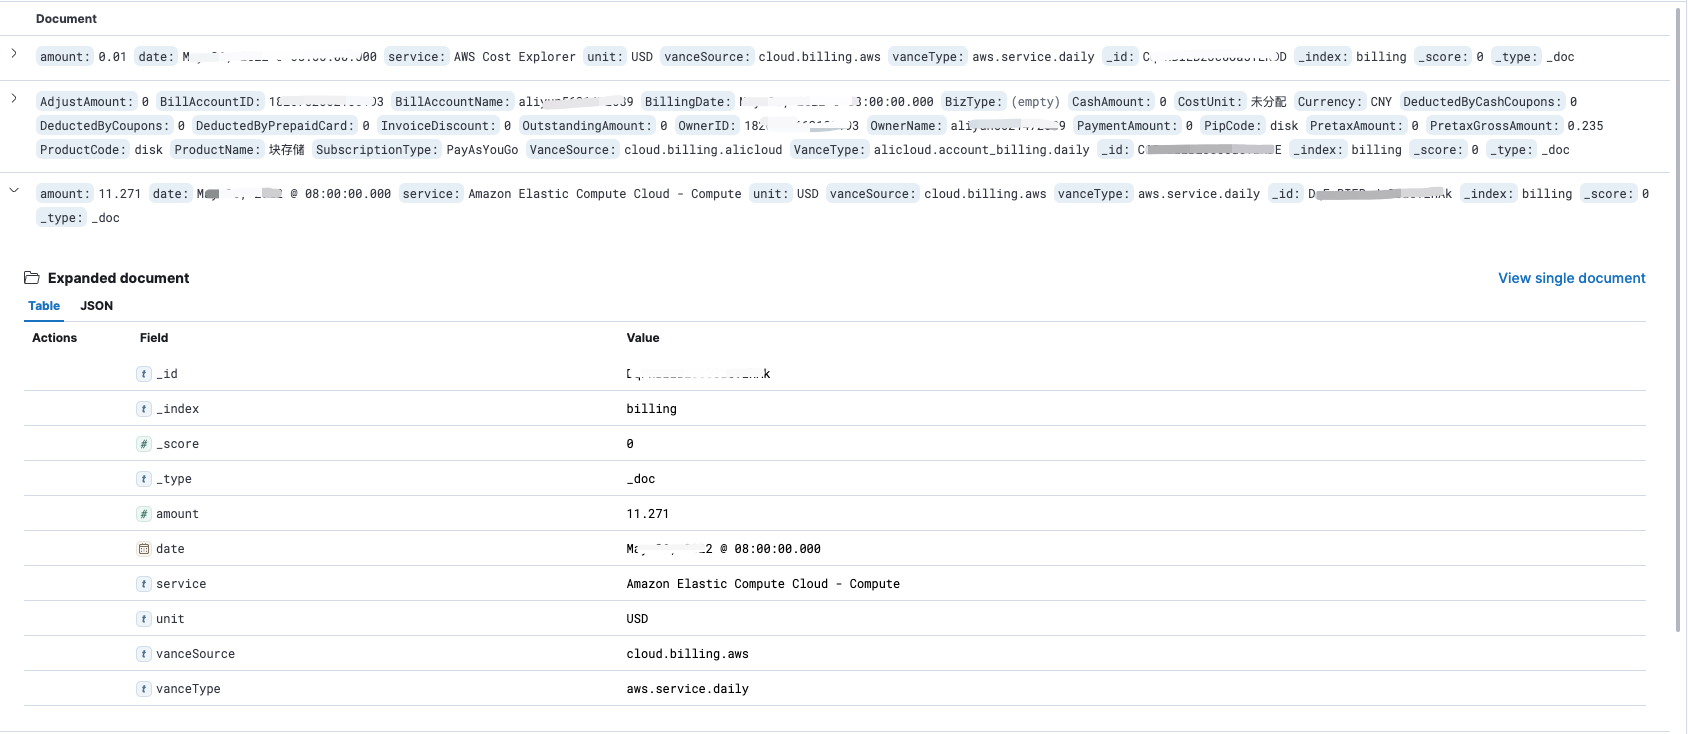
In this tutorial, you will learn how to use Cloud Billing Source of Vanus to aquire the billing from Cloud Service providers like AWS, and store the data in Elasticsearch.

AWS Billing to Elasticsearch integration

Prerequisites

  • AWS IAM Access Key.

  • AWS permissions ce:GetCostAndUsage for the IAM user.

  • Elasticsearch and Kibana are up and running

  • Go to Vanus Playground :an online K8s environment where Vanus can be deployed.

Step 1: Deploying Vanus

  1. Login Vanus Playground.

  2. Refer to the Quick Start document to complete the Install Vanus & Install vsctl.

  3. Create an eventbus

    ~ # vsctl eventbus create --name aws-billing
    +----------------+-------------+
    | RESULT | EVENTBUS |
    +----------------+-------------+
    | Create Success | aws-billing |
    +----------------+-------------+

Step 2: Deploy the AWS Billing Source

Use command line create AWS Billing Source

  1. Create the config file

    cat << EOF > config.yml
    target: http://192.168.49.2:30002/gateway/aws-billing
    secret:
    access_key_id: AKIAIOSFODNN7***MPLE
    secret_access_key: wJalrXUtnFEMI/K7MDENG/bP**iCYEXAMPLEKEY
    EOF
  2. Start with Docker

    docker run -it --rm --network=host \
    -v ${PWD}:/vanus-connect/config \
    --name source-aws-billing public.ecr.aws/vanus/connector/source-aws-billing

Step 3: Deploy the Elasticsearch Sink

Use the command line of Vanus create the event target: Elasticsearch Sink

  1. Create a yml file named sink-es.yml in the playground with the following command:

    cat << EOF > sink-es.yml
    apiVersion: v1
    kind: Service
    metadata:
    name: sink-es
    namespace: vanus
    spec:
    selector:
    app: sink-es
    type: ClusterIP
    ports:
    - port: 8080
    name: sink-es
    ---
    apiVersion: v1
    kind: ConfigMap
    metadata:
    name: sink-es
    namespace: vanus
    data:
    config.yml: |-
    port: 8080
    es:
    address: "http://localhost:9200"
    index_name: "vanus_test"
    username: "elastic"
    password: "elastic"
    ---
    apiVersion: apps/v1
    kind: Deployment
    metadata:
    name: sink-es
    namespace: vanus
    labels:
    app: sink-es
    spec:
    selector:
    matchLabels:
    app: sink-es
    replicas: 1
    template:
    metadata:
    labels:
    app: sink-es
    spec:
    containers:
    - name: sink-es
    image: public.ecr.aws/vanus/connector/sink-elasticsearch
    imagePullPolicy: Always
    ports:
    - name: http
    containerPort: 8080
    volumeMounts:
    - name: config
    mountPath: /vanus-connect/config
    volumes:
    - name: config
    configMap:
    name: sink-es
    EOF
  2. Replace the config value with yours.

    es:
    address: "http://localhost:9200"
    index_name: "vanus_test"
    username: "elastic"
    password: "elastic"
  3. Run es sink in kubernetes.

    kubectl apply -f sink-es.yaml

Step 4: Create Subscription

Create Subscription Event, here can do filter before deliver event to sink end, execute the following command:

vsctl subscription create \
--eventbus aws-billing \
--sink 'http://sink-es:8080' \
--filters '[
{
"suffix": {
"source":".billing"
}
}
]'
  • sink Points to the target end of the event delivery.
  • filters The method of filter the events.
    • use keyword suffix to do the postfix match for attribute source

Step 5: Result Checking

Check the Billing Data. Now let's connect to kibana so that we can manage data and perform data analysis.

billing-kibana

Summary

In this tutorial, we learned how to integrate AWS Billing Source and Elasticsearch Sink. Of course, Vanus also have connectors for bills of other cloud services , learn more about Vanus Connect.

· 4 min read

The traditional message queue requires subscribers to do the message filter/process on the client end or after receiving messages from Topics. This approach takes extra resources and needs additional codes/scripts, largely increasing complexity. Adding the filtering ability into the messaging infrastructure would greatly benefit the user.

Benefits of filtering

Filtering messages in a message queue can provide several benefits, including:

  1. Increased efficiency: By filtering messages, you can reduce the number of messages that a consumer needs to process. This can help improve the overall efficiency of the system, as fewer resources will be needed to handle the message traffic.
  2. Improved performance: Filtering messages can help ensure that only relevant messages are processed by consumers, which can improve the overall performance of the system. This is particularly important in high-throughput systems where there are large volumes of messages that need to be processed.
  3. Reduced processing time: By filtering messages based on specific criteria, you can ensure that only the most important or urgent messages are processed first. This can help reduce processing time for critical messages, which can be particularly important in real-time systems or systems that require fast response times.
  4. Enhanced scalability: Filtering messages can help improve the scalability of the system by reducing the load on individual consumers. By distributing the workload more evenly across multiple consumers, you can help ensure that the system can handle larger volumes of messages without being overwhelmed.

Overall, filtering messages in a message queue can help optimize the performance, efficiency, and scalability of the system, while also ensuring that critical messages are processed in a timely manner.

Vanus's Filter

In Vanus, the filter feature is a set of conditions we can set to a Subscription to filter the events we want to consume from an Eventbus. Completes the events filter, then you can do transformation and delivers the events.

setting-filter

Vanus Filter is fully compatible with CloudEvents attributes, and it's also extended to support the filtering of CloudEvents data.

Filter Types

Event Demo

Here are 3 event examples, we will use them to show how each of the following 7 filter dialects would work on these 3 events.

  • Event 1
{
"id": "080e28a0-b437-11ed-9250-18275c0cc45b",
"source": "https://api.github.com/repos/vanus-demo/test-repo",
"type": "com.github.star.created",
"datacontenttype": "application/json",
"time": "2022-02-21T07:32:44.190Z",
"data": {
"action": "created",
"sender": {
"login": "vanus-demo",
"type": "User"
}
}
}
  • Event 2
{
"id": "080e28a0-b437-11ed-9250-18275c0cc45b",
"source": "https://api.github.com/repos/vanus-demo/test-repo",
"type": "com.github.watch.started",
"datacontenttype": "application/json",
"time": "2022-02-21T07:32:44.190Z",
"data": {
"action": "created",
"sender": {
"login": "vanus-demo",
"type": "User"
}
}
}
  • Event 3
{
"id": "080e28a0-b437-11ed-9250-18275c0cc45b",
"source": "https://api.github.com/repos/vanus-demo/test-repo",
"type": "com.github.star.created",
"datacontenttype": "application/json",
"time": "2022-02-21T07:32:44.190Z",
"data": {
"action": "deleted",
"sender": {
"login": "vanus-demo",
"type": "User-test"
}
}
}

Exact filter

Match CloudEvents attributes; that value must match exactly with the associated value.

{ 
"exact": {
"source": "https://api.github.com/repos/vanus-demo/test-repo",
"datacontenttype": "application/json"
}
}

Match event: Event 1、Event 2、Event 3

Prefix filter

Match CloudEvents attributes; that value must all start with the associated value.

{ 
"prefix": {
"source": "https://api.",
"type": "com.github.star."
}
}

Match event: Event 1、Event 3

Suffix filter

Match CloudEvents attributes; that value must all end with the associated value.

{ 
"suffix": {
"type": ".created",
"data.action": "eted"
}
}

Match event: Event 3

Not filter

One nested filter expressions; inverse of filter expressions.

{
"not": {
"exact": {
"type": "com.github.star.created"
}
}
}

Match event: Event 2

All filter

A nested array of filter expressions; all filter expressions evaluate to true.

{
"all": [
{ "exact": { "source": "com.github.star.created" } },
{ "prefix": { "data.sender.type": "User-te" } }
]
}

Match event: Event 3

Any filter

A nested array of filter expressions; any filter expressions evaluate to true.

{
"any": [
{ "exact": { "type": "com.github.watch.started" } },
{ "prefix": { "data.action": "created" } }
]
}

Match event: Event 1、Event 2

SQL filter

A CloudEvents SQL Expression

{ "sql": "data.sender.login LIKE '%vanus%'" }

Match event: Event 1、Event 2、Event 3

· 5 min read

Using the events in GitHub for analysis can help you better understand the behavior of developer on GitHub. By analyzing data, you can draw various useful conclusions to support your business needs.

Concept

About events in GitHub

GitHub is a web-based hosting service that provides version control and collaboration features for software development projects. It allows users to create and store repositories for their projects, track changes to code, collaborate with others on coding projects, and contribute to open source software projects.

GitHub provides a number of features for tracking events related to your projects. These events include:

  1. Push events - occur when a user pushes code changes to a repository.
  2. Pull request events - occur when a user creates, updates, or closes a pull request.
  3. Issue events - occur when a user creates, updates, or closes an issue.
  4. Release events - occur when a user creates a new release of a project.
  5. Fork events - occur when a user forks a repository.
  6. Watch events - occur when a user starts or stops watching a repository.

GitHub also allows you to configure webhooks, which can be used to send notifications to external services when certain events occur in your repository. For example, you can configure a webhook to send a notification to a chat service when a pull request is created or updated.

Overall, GitHub provides a comprehensive set of features for tracking events related to your projects and collaborating with others on coding projects.

About Snowflake

Snowflake is a cloud-based data warehousing and analytics platform that allows organizations to store, manage, and analyze large amounts of data in a scalable and cost-effective way.

One of the key features of Snowflake is its architecture, which separates compute and storage. This allows organizations to scale compute and storage resources independently, and pay only for the resources they use. Snowflake also supports both structured and semi-structured data, including JSON, Avro, Parquet, and ORC.

Snowflake also provides a number of built-in features and services for data warehousing and analytics.

Overall, Snowflake provides a modern and flexible solution for data warehousing and analytics in the cloud, with a focus on scalability, performance, and security.

Easy GitHub to Snowflake integration with Vanus

Vanus’s open source connection allows you to integrate Vanus with your GitHub events to track event data and automatically send it to Snowflake.

Prerequisites

  • GitHub: your open-source repository.
  • Snowflake: a working Snowflake account.
  • Go to Vanus Playground :an online K8s environment where Vanus can be deployed.

Step 1: Deploying Vanus

  1. Login Vanus Playground.

  2. Refer to the Quick Start document to complete the Install Vanus & Install vsctl.

  3. Create an eventbus

    ~ # vsctl eventbus create --name github-snowflake
    +----------------+------------------+
    | RESULT | EVENTBUS |
    +----------------+------------------+
    | Create Success | github-snowflake |
    +----------------+------------------+

Step 2: Deploy the GitHub Source

  1. Set config file. Create config.yml in any directory, the content is as follows:

    target: http://192.168.49.2:30002/gateway/github-snowflake
    port: 8082
  2. Run the GitHub Source

    docker run -it --rm --network=host \
    -v ${PWD}:/vanus-connect/config \
    --name source-github public.ecr.aws/vanus/connector/source-github > a.log &
  3. Create a webhook under the Settings tab in your GitHub repository.

    setting-github

    Payload URL*

    Go to GitHub-Twitter Scenario under Payload URL.

    http://ip10-1-53-4-cfie9skink*******0-8082.direct.play.linkall.com

    Content type

    application/json

    Which events would you like to trigger this webhook?

    Send me everything.

Step 3: Deploy the Snowflake Sink

  1. Create a yml file named sink-snowflake.yml in the playground with the following command:

    cat << EOF > sink-snowflake.yml
    apiVersion: v1
    kind: Service
    metadata:
    name: sink-snowflake
    namespace: vanus
    spec:
    selector:
    app: sink-snowflake
    type: ClusterIP
    ports:
    - port: 8080
    name: sink-snowflake
    ---
    apiVersion: v1
    kind: ConfigMap
    metadata:
    name: sink-snowflake
    namespace: vanus
    data:
    config.yml: |-
    port: 8080
    snowflake:
    host: "myaccount.ap-northeast-1.aws.snowflakecomputing.com"
    username: "vanus_user"
    password: "snowflake"
    role: "ACCOUNTADMIN"
    warehouse: "xxxxxx"
    database: "VANUS_DB"
    schema: "public"
    table: "vanus_test"
    ---
    apiVersion: apps/v1
    kind: Deployment
    metadata:
    name: sink-snowflake
    namespace: vanus
    labels:
    app: sink-snowflake
    spec:
    selector:
    matchLabels:
    app: sink-snowflake
    replicas: 1
    template:
    metadata:
    labels:
    app: sink-snowflake
    spec:
    containers:
    - name: sink-snowflake
    image: public.ecr.aws/vanus/connector/sink-snowflake
    imagePullPolicy: Always
    resources:
    requests:
    memory: "128Mi"
    cpu: "100m"
    limits:
    memory: "128Mi"
    cpu: "100m"
    ports:
    - name: http
    containerPort: 8080
    volumeMounts:
    - name: config
    mountPath: /vanus-connect/config
    volumes:
    - name: config
    configMap:
    name: sink-snowflake
    EOF
  2. Replace the config value with yours.

    host: "myaccount.ap-northeast-1.aws.snowflakecomputing.com"
    username: "vanus_user"
    password: "snowflake"
    role: "ACCOUNTADMIN"
    warehouse: "xxxxxx"
    database: "VANUS_DB"
    schema: "public"
    table: "vanus_test"
  3. Run snowflake sink in kubernetes.

    kubectl apply -f sink-snowflake.yaml

Step 4: Create subscription

Through the deployment of the above parts, the components required to push GitHub events to Snowflake have been deployed. And GitHub events can be filtered and processed through the filter and transformer capabilities of Vanus.

  1. Through a filter, you can filter out other events and only post the GitHub events they are interested in. For example:StarEvent(CloudEvents Adapter specification).
  2. Create a subscription in Vanus, and set up a transformer to extract and edit key information.
vsctl subscription create  \
--eventbus github-snowflake \
--sink 'http://sink-snowflake:8080' \
--filters '[
{ "exact": { "type": "com.github.star.created" } }
]'
--transformer '{
"define": {
"login": "$.data.repository.owner.login",
"star": "$.data.repository.stargazers_count",
"repo": "$.data.repository.html_url"
"sender":"$.data.sender.login",
"time":"$.data.repository.updated_at"
},
"template": "{\"owner\": \"<login>\",\"star\":\"<star>\",\"repo\":\"<repo>\",\"sender\":\"<sender>\",\"time\":\"<time>\"}"
}'

Step 5: Test

Open the Snowflake console and use the following command to make sure Snowflake has the data.

select * from public.vanus_test;

Summary

Snowflake provide a powerful platform for analyzing GitHub event data. By loading the data into Snowflake, creating tables, cleaning data, analyzing data, visualizing data, and drawing conclusions, you can get deep insights about the value of GitHub events and use those insights to optimize your business decisions.

· 12 min read

As a developer for a popular e-commerce website, you know that integrating with external APIs is a common requirement for modern applications. However, if your website's database is built using MySQL, you may face limitations when it comes to making HTTP requests. To overcome this challenge, you can build a custom MySQL pipeline that can send HTTP requests to the API. In this article, we will explore how to build such a pipeline using Vanus, a lightweight tool designed to stream data from MySQL databases to HTTP endpoints. With Vanus, you can easily integrate your MySQL database with external APIs, allowing your application to benefit from the latest data and functionality available in third-party services.

Table of content

Event Streaming

Event streaming is a technology that has gained significant popularity in modern applications. It involves the continuous and real-time processing of events or data generated by various sources. These events could include user actions, system events, sensor data, and more. By processing these events in real-time, applications can quickly respond to changes and make decisions based on the most up-to-date information.

Event streaming is particularly important in modern applications where data volumes are high and the need for real-time processing is critical. Traditional batch processing methods, where data is collected and processed in batches, can result in latency and delay in processing important events. Event streaming allows for a more responsive and real-time approach to data processing, which is essential in today's fast-paced digital landscape.

Vanus is an open-source tool designed to facilitate event streaming from various sources. It allows users to collect, filter, and route events to different destinations in real-time. Vanus enables users to build flexible and robust event streaming pipelines that can be easily integrated into modern applications.

MySQL

Setting up a MySQL database

Setting up a MySQL database is the first step towards building a custom MySQL pipeline. Here's a detailed explanation of how to set up a MySQL database:

  1. Download and Install MySQL: The first step is to download and install MySQL on your computer. You can download MySQL Community Edition for free from the MySQL website. Make sure to choose the correct version for your operating system.
  2. Configure MySQL: After installing MySQL, you need to configure it. During the installation process, you will be prompted to set a root password for the MySQL server. Make sure to remember this password, as you will need it later.
  3. Start MySQL Server: Once you have installed and configured MySQL, you need to start the MySQL server. To do this, open a terminal or command prompt and run the following command:
Copy code
sudo systemctl start mysqld
  1. This command starts the MySQL server and enables it to run in the background. Log in to MySQL: To interact with the MySQL server, you need to log in to it using the root password you set during the configuration process. To do this, run the following command:
mysql -u root -p
  1. This command logs you in to the MySQL server as the root user. Create a Database: Once you are logged in to the MySQL server, you can create a new database using the following command:
Copy code
CREATE DATABASE <database_name>;
  1. Replace <database_name> with the name you want to give your database. Create a Table: After creating a database, you need to create a table in the database. Tables are used to store data in a MySQL database. You can create a table using the following command:
Copy code
CREATE TABLE <table_name> (
<column_name> <data_type> <constraint>,
...
);
  1. Replace \<table_name> with the name you want to give your table. \<column_name> represents the name of the column you want to create, and \<data_type> represents the data type of the column. \<constraint> is an optional parameter that sets constraints on the column. Insert Data: After creating a table, you can insert data into it using the following command:
INSERT INTO <table_name> (<column_name>, <column_name>, ...) VALUES (<value>, <value>, ...);

Replace \<table_name> with the name of your table, \<column_name> with the name of the column you want to insert data into, and \<value> with the value you want to insert.

With these steps, you have set up a MySQL database and created a table with data. Now you can move on to building your custom MySQL pipeline that can send HTTP requests to an external API.

MySQL to HTTP scenarios

here are 10 real-life scenarios where you might need to set up a MySQL to HTTP pipeline:

  • E-commerce website: As mentioned earlier, if you are building an e-commerce website with MySQL as the database, you may need to integrate with an external API that provides shipping or payment services. A MySQL to HTTP pipeline can be used to send data from the database to the API.
  • Healthcare applications: Healthcare applications often need to integrate with external systems that provide electronic health records or patient information. A MySQL to HTTP pipeline can be used to securely transmit data to these systems.
  • Financial applications: Financial applications may need to integrate with external systems that provide stock market data or banking services. A MySQL to HTTP pipeline can be used to send data to these systems.
  • Social media platforms: Social media platforms may need to integrate with external systems that provide analytics or advertisement services. A MySQL to HTTP pipeline can be used to send data from the database to these systems.
  • Customer relationship management (CRM) systems: CRM systems may need to integrate with external systems that provide customer support or sales services. A MySQL to HTTP pipeline can be used to send data from the database to these systems.
  • Manufacturing and logistics: Manufacturing and logistics applications often need to integrate with external systems that provide supply chain management or inventory control services. A MySQL to HTTP pipeline can be used to send data to these systems.
  • IoT devices: IoT devices often generate large amounts of data that needs to be stored and analyzed. A MySQL to HTTP pipeline can be used to send this data to external analytics or visualization tools.
  • Gaming platforms: Gaming platforms may need to integrate with external systems that provide player statistics or leaderboard services. A MySQL to HTTP pipeline can be used to send data from the database to these systems.
  • Government services: Government services often need to integrate with external systems that provide data on weather, traffic, or crime statistics. A MySQL to HTTP pipeline can be used to send data from the database to these systems.
  • Educational platforms: Educational platforms may need to integrate with external systems that provide content or assessment services. A MySQL to HTTP pipeline can be used to send data from the database to these systems.

Pre-requisite

  • A MySQL Server
  • A Kubernetes cluster (We will use the playground)
  • A webhook server (For testing use webhook for a free endpoint)

How to send customized events from MySQL to HTTP

Here are the steps you can follow to send email notifications from any MySQL event.

Step 1: Deploy Vanus on the Playground

  • Wait until the K8s environment is ready (usually less than 1 min).

  • Install Vanus by typing the following command:

    kubectl apply -f https://dl.vanus.ai/all-in-one/v0.6.0.yml

  • Verify if Vanus is deployed successfully:

$ watch -n2 kubectl get po -n vanus
vanus-controller-0 1/1 Running 0 96s
vanus-controller-1 1/1 Running 0 72s
vanus-controller-2 1/1 Running 0 69s
vanus-gateway-8677fc868f-rmjt9 1/1 Running 0 97s
vanus-store-0 1/1 Running 0 96s
vanus-store-1 1/1 Running 0 68s
vanus-store-2 1/1 Running 0 68s
vanus-timer-5cd59c5bf-hmprp 1/1 Running 0 97s
vanus-timer-5cd59c5bf-pqkd5 1/1 Running 0 97s
vanus-trigger-7685d6cc69-8jgsl 1/1 Running 0 97s
  • Install vsctl (the command line tool).

    curl -O https://dl.vanus.ai/vsctl/latest/linux-amd64/vsctl
    chmod ug+x vsctl
    mv vsctl /usr/local/bin
  • Set the endpoint for vsctl.

    export VANUS_GATEWAY=192.168.49.2:30001
  • Create an Eventbus to store your events.

    $ vsctl eventbus create --name mysql-http-scenario
    +----------------+--------------------+
    | RESULT | EVENTBUS |
    +----------------+--------------------+
    | Create Success | mysql-http-scenario|
    +----------------+--------------------+

Step 2: Deploy the MySQL Source Connector

  • Enable binary logging if you have disabled it (MySQL default Enabled). Create a new USER and grant roles, choose a unique password for the user.

To enable binary logging in MySQL, you need to perform the following steps:

  1. Open the MySQL configuration file, which is typically located at /etc/mysql/my.cnf on Linux or C:\ProgramData\MySQL\MySQL Server 8.0\my.ini on Windows.
  2. Look for the [mysqld] section of the configuration file, which contains various settings for the MySQL server.
  3. Add the following line to the [mysqld] section to enable binary logging:
log-bin=mysql-bin

This will tell MySQL to create binary log files in the mysql-bin directory. You can change the name of the directory if you prefer.

  1. Save the configuration file and restart the MySQL server for the changes to take effect:
sudo service mysql restart

or

sudo systemctl restart mysql
  1. Verify that binary logging is enabled by logging into the MySQL server and running the following command:
SHOW MASTER STATUS;

This will display information about the binary log files that are currently being used by the MySQL server. If binary logging is not enabled, this command will return an error.

  CREATE USER 'vanus'@'%' IDENTIFIED WITH mysql_native_password BY 'PASSWORD';
GRANT SELECT, RELOAD, SHOW DATABASES, REPLICATION SLAVE, REPLICATION CLIENT ON . TO 'vanus'@'%';
  • Create the config file for MySQL in the Playground. Change MYSQL_HOST, MYSQL PORT, PASSWORD, DATABASE_NAME, and TABLE_NAME.
cat << EOF > config.yml
target: http://192.168.49.2:30002/gateway/mysql-http-scenario # Vanus in Playground
name: "quick_start"
db:
host: "MYSQL_HOST" # IP address of MySQL server
port: MYSQL PORT # port address of MySQL server
username: "vanus" # Username
password: "PASSWORD" # Password previously set
database_include: [ "<DATABASE_NAME>" ] # The name of your database


# format is vanus_test.tableName
table_include: [ "TABLE_NAME" ] # The name of your Table

store:
type: FILE
pathname: "/vanus-connect/data/offset.dat"

db_history_file: "/vanus-connect/data/history.dat"
EOF
  • Run MySQL Source in the background
  docker run -it --rm --network=host \
-v ${PWD}:/vanus-connect/config \
-v ${PWD}:/vanus-connect/data \
--name source-mysql public.ecr.aws/vanus/connector/source-mysql &

Step 3: Deploy the HTTP Sink Connector

To run the HTTP sink in Kubernetes, you will need to follow the below steps:

  • Create a Kubernetes deployment file (e.g., sink-http.yaml) that includes the following configurations:
cat << EOF > sink-http.yml
apiVersion: v1
kind: Service
metadata:
name: sink-http
namespace: vanus
spec:
selector:
app: sink-http
type: ClusterIP
ports:
- port: 8080
name: sink-http
---
apiVersion: v1
kind: ConfigMap
metadata:
name: sink-http
namespace: vanus
data:
config.yml: |-
port: 8080
target: http://address.com
---
apiVersion: apps/v1
kind: Deployment
metadata:
name: sink-http
namespace: vanus
labels:
app: sink-http
spec:
selector:
matchLabels:
app: sink-http
replicas: 1
template:
metadata:
labels:
app: sink-http
spec:
containers:
- name: sink-http
image: public.ecr.aws/vanus/connector/sink-http:latest
imagePullPolicy: Always
resources:
requests:
memory: "128Mi"
cpu: "100m"
limits:
memory: "128Mi"
cpu: "100m"
ports:
- name: http
containerPort: 8080
volumeMounts:
- name: config
mountPath: /vanus-connect/config
volumes:
- name: config
configMap:
name: sink-http
EOF

  • Edit the configuration in it.
vi sink-http.yaml

NOTE: Remember to replace values of URL and Port.

Check out the results

  • Finally, you can create a subscription that will define how the events should be transformed before being sent to the sink connector.
  • You can use the following command to create a subscription:
Copy code
vsctl subscription create \
--name mysql-http-subscription \
--eventbus mysql-http-scenario \
--sink sink-http \
--transformer '{
"define": {
"user": "$data.user",
"password": "$data.passwprd",
"email": "$data.email"
},
"template": {
"User": "<user>",
"Password": "<password>",
"Email": "<email>"
}
}'

Here, we are creating a subscription named "mysql-http-subscription" that will consume events from the "mysql-http-scenario" Eventbus and send them to the "sink-http" sink connector. We are defining three variables using the "define" parameter: "user", "password", and "email", which will store the corresponding values from the incoming events. Finally, we are using the "template" parameter to create a JSON template that will replace the variables with their corresponding values in the transformed events. Once you have created the subscription, it will start consuming events from the Eventbus, transform them according to the specified rules, and send them to the HTTP endpoint using the sink connector.

Conclusion

In conclusion, connecting MySQL to HTTP endpoints can be a powerful tool for data integration and automation. By using Vanus, we can easily set up subscriptions to capture changes in MySQL databases and send them to HTTP endpoints in real-time, without the need for complex coding or configuration. This can enable a wide range of use cases, from syncing data between systems to triggering workflows based on database events. With the step-by-step guide and examples provided in this article, you should now have a good understanding of how to use Vanus to create MySQL-to-HTTP subscriptions and customize them using the transformer feature. We hope this article has been helpful in getting you started with this powerful tool and exploring the possibilities it offers for your data integration needs.

· 8 min read

The previous article shared the concept, characteristics, and value of cloud-native to digital enterprises. This article will share how to build a cloud native application, the challenges encountered in building cloud native applications, and current industry solutions.

How Traditional Enterprises Build Applications

The construction of enterprise applications generally needs to solve three basic problems: how to build programs, how to communicate between programs, and program monitoring and operation and maintenance. In different periods, software infrastructure, software architecture, and application scenarios are quite different, so many different middleware software have been born to help enterprises build business applications. The following table lists the middleware that is often used to build applications.

TimeInfraRuntimeAsync middlewareSync middleware
2000sHardwareTomcat(1999)IBMMQ(1990), ActiveMQ (2004),RabbitMQ(2006)JBoss ESB,Mule ESB
2010sVirtual MachineSpringboot(2012)Kafka(2010),Pulsar(2012)SpringCloud,grpc

In 2000 and before, applications were deployed on physical servers. At that time, most of the programs used a monolithic architecture, and usually the programs were packaged and run on web servers such as Tomcat or webLogic. The applications at that time were generally designed based on the SOA architecture, and services were discovered and invoked through the ESB before the application. In some cases, such as data exchange between different manufacturers, data needs to be sent asynchronously, and a message bus such as IBMMQ or RabbitMQ will be used.

Around 2010, there was a big change in the software infrastructure. With the rise of virtualization open source projects such as Openstack at any time, more and more enterprises feel that virtualization can bring huge advantages such as higher resource utilization, better maintainability and flexibility, and lower costs. Switched from a physical machine to a virtual machine. The corresponding software architecture has also undergone tremendous changes, and more enterprises have begun to replace the previous traditional SOA architecture with microservice architecture.

Enterprises have new requirements for the tools for building application software. Because of its light weight and convenient deployment, SpringBoot became the mainstream choice for deploying microservices at that time. Open source microservice framework applications such as SpringCloud, Dubbo, and Grpc can better leverage the flexibility and scalability of virtual machines, and have become the best practice for building microservice architectures. Compared with traditional software architectures, the cluster size of microservice architecture applications is an order of magnitude larger than before. This puts higher requirements on the middleware of asynchronous communication, because the new generation of message queues such as Kafka and Pulsar, which can support larger cluster scale and have higher throughput, became the mainstream choice for enterprises to build microservice architecture at that time.

How to build cloud-native applications

In 2020, due to the impact of the new crown epidemic, many enterprises and organizations around the world began to accelerate digital transformation, and cloud migration has become the mainstream choice for global digital enterprises. This year, the infrastructure of the application software was switched again. More enterprises are choosing to switch from self-supporting computer rooms to managed cloud services, and enterprise software is gradually switching from being deployed on virtual machines to containers, a new type of infrastructure. The cloud has become the base and infrastructure of the digital economy.

As mentioned in the previous article, the cloud has the characteristics of pay-as-you-go and elastic scaling, which can give enterprises lower usage costs and higher flexibility, and can accelerate enterprise innovation. There is no doubt about it. How to enable enterprises to enjoy the dividends of cloud computing is the key to the problem, which is also the value of enterprises building cloud-native applications. Unlike traditional applications, cloud-native applications are built on brand-new infrastructure, and many traditional construction tools are difficult to apply in cloud-native scenarios. The biggest challenge in building cloud-native applications is elasticity. How to build an elastic application that meets business requirements and cloud operation characteristics, and how to monitor and manage elastic applications if it supports communication between elastic applications has become the three problems that must be solved when building cloud-native applications.

Build fully elastic, on-demand applications

​ The biggest feature of the cloud is elasticity. Because cloud-native applications have good elasticity, when the business increases rapidly, the application can be rapidly expanded to support incremental business and ensure the safe operation of enterprise business. Similarly, when the business volume decreases, the application can be quickly scaled down to reduce the cost of enterprise cloud consumption. However, this does not mean that applications deployed on the cloud will be elastic. Moving traditional enterprise applications directly to the cloud will not be able to enjoy the benefits of cloud computing. Traditionally deployed applications in SpringBoot will obviously not be able to provide flexibility in the cloud. .

Building elastic applications based on K8s may be the first choice for cloud nativeization. K8s itself provides the ability to schedule, orchestrate, and expand underlying computing resources. Based on the elasticity provided by K8s, the application can automatically expand pods when the load is high, and automatically shrink the number of pods to determine whether to calculate resources when the load decreases. Many high-concurrency business applications, such as e-commerce systems, taxi-hailing systems, machine learning applications, IoT applications, etc., are more suitable for building based on k8s. K8s also provides powerful container orchestration and automatic management functions, which can easily manage and expand various services of microservice applications, including load balancing, automatic scaling, failure recovery, and deployment upgrades. The scheme of building elastic applications through k8s also has some shortcomings. K8s is very complicated, requires a lot of learning costs, and has high requirements for R&D personnel. In addition, applications built on the basis of K8s cannot obtain fully elastic capabilities. Because K8s natively supports fewer elastic scaling indicators, it currently only supports resource indicators such as CPU and memory, and business support needs to be expanded by itself. Moreover, K8s can only support the expansion and contraction of the application from 1 to N, and cannot support the expansion and contraction from 0 to 1.

For some scenarios with low-frequency high-traffic bursts or short-term tasks, it is more appropriate to use Serverless programs than to build directly based on k8s. For example, file processing, when a large file is uploaded, a large number of processing operations such as transcoding, scaling, and cutting need to be performed on the fast file, but the frequency of file uploading is very low. At this time, K8s has weak longitudinal elasticity and it is difficult to meet such high-elasticity scenarios. Serverless programs are more suitable for such scenarios with features such as fast elastic scaling and pay-as-you-go. For example, aws lambda can quickly expand the capacity of 1,000 instances at the second level to meet sudden business needs, and after processing, all computing resources can be charged according to the number of calls. Another example is some short-term task scenarios, which may only run very rarely every day. If deployed on k8s, at least one pod's computing resources will be required. It is more appropriate to use a serverless program, because a serverless program is event-driven. When a business event is required, the function will be called to run, and it will not occupy computing resources at other times.

At present, there are many open source serverless projects in the industry, such as Knative, KEDA, OpenFaaS, OpenWisk, etc. If you want to build a one-stop serverless solution through open source, Knative may be a better choice. Knative is an open source enterprise-level solution for building serverless and event-driven applications built on top of K8s. It is also an open source project incubated by CNCF. It has graduated and the open source community is relatively active. Knative can help users manage the life cycle of the entire container, and realize the automatic expansion and contraction of containers from 0 to N. In addition, Knative also provides a lightweight Function, allowing users to submit only simple functions, which can create functions and manage function workflows. The disadvantage of Knative is that it is relatively complicated and has a high learning threshold, and running Knative requires the deployment of Istio, Kafka and other projects at the same time. The operation and maintenance are very complicated, which poses a great test to open source personnel.

For users who currently deploy most of their business on k8s and want to have serverless flexibility, the KEDA project may be a very good choice. KDEA is an open source K8s event-driven scaling component, and the project is developed by Microsoft. It is also an open source project incubated by the CNCF Foundation. The positioning of KEDA is different from that of Knative. It is only an open source component and does not provide the runtime environment of the program. KDEA can help K8s applications realize automatic scaling from 0 to 1. At the same time, KEDA provides access to dozens of event sources including Kafka, Datadog, AWS DynamoDB, etc., which can help K8s applications quickly build an event-driven serverless application. KEDA itself can also detect the rate of event requests in real time, and dynamically expand and shrink Pods according to events.

· 7 min read

Cloud-native has been mentioned countless times in technical speeches and articles in recent years and has almost become a synonym for cloud computing technology. However, many developers do not have a clear understanding of the value of cloud native and the challenges that may arise when implementing cloud native applications. I would like to explain the meaning, value, and implementation challenges of cloud native through two articles. The first article, which is this one, will share what cloud native is, the characteristics of cloud native applications, and the huge value that cloud native brings to enterprises. The second article will analyze the technologies and challenges involved in building cloud native applications.

The concept of cloud-native

In a broad sense, cloud native is a set of methodologies for building software on the cloud. These methods can help enterprises build application software that is most suitable for running on the cloud. We call it cloud native applications. Compared with traditional applications, cloud-native applications are characterized by agility and elasticity and can better utilize the capabilities of cloud computing, so they are the best practices for building applications on the cloud. In a narrow sense, the CNCF Foundation has given a relatively clear definition. Cloud native technology can help organizations build and run scalable applications in modern dynamic environments such as public clouds, private clouds, and hybrid clouds. CNCF also gives some specific technologies for building cloud-native applications, such as containers, servicemesh, microservices, immutable infrastructure, and declarative APIs.

In order to facilitate understanding, make a simple analogy. If building traditional application software is like building a bungalow in the countryside, then building cloud-native applications is similar to building a building in a city. Compared with bungalows, buildings are obviously more able to play the characteristics of the city. For example, due to spatial agglomeration, limited urban land resources and high population density, buildings can better accommodate the needs of urban residents. Obviously, the structures of bungalows and buildings are completely different, so the construction of buildings also requires new technologies. For example, one-story houses usually need to be built by stacking bricks, and this process is obviously very inefficient for building buildings. Therefore, the construction of buildings usually uses techniques such as concrete pouring. Therefore, technologies such as containers, servicemesh, and serverless are not unfathomable, they are just a kind of technology needed in the process of building cloud-native applications.

From the perspective of cloud native, the digital development of enterprises is divided into three stages, as shown in the following figure. In the first stage, traditional applications are deployed in local data centers, similar to bungalows built in rural areas. In the second stage, traditional applications are migrated to the public cloud, similar to a bungalow built in a city. In the third stage, cloud-native applications run on public clouds, similar to buildings built in cities. The digitalization process of enterprises in different industries and regions varies greatly. For example, from an overall point of view, the digitalization stage of the United States is superior to that of India, even if the digitalization degree of the Internet industry and the retail industry in the United States are not the same. The Internet industry has the highest degree of digitization, and most companies are in the third stage. In the retail industry, the digitalization of a considerable number of enterprises may only be in the second stage. Even in some industries that are lagging behind in digitalization, enterprise digitalization is still at the first stage.

cloud-native-phase

Cloud Native Applications and Features

Compared with traditional applications, cloud-native applications are characterized by elasticity, agility, and automation.

Elasticity means that cloud-native applications can dynamically adjust the size of their clusters based on business needs, so that based on business needs, the cluster size of application software can be automatically expanded and contracted. Take Uber as an example to illustrate. During rush hour, a large number of users need to take taxis through Uber. At this time, Uber needs a large cluster to support the taxi requests of a large number of users. In the early hours of the morning, when few people take a taxi, these Ubers need to release computing resources and shrink them into a relatively small cluster. This characteristic of cloud-native applications is also built by fully giving cloud computing elastic computing power scheduling capabilities.

Agility means that the modules of cloud-native applications are loosely coupled, and each module can be developed, deployed, and upgraded independently. With the deepening of enterprise digitization, the business system will become more and more complex. Complex business will reduce the release speed and upgrade frequency of the system, and seriously reduce the response time of user needs. Through the transformation of cloud-native applications, a huge business system is split into very small business digital units. Each digital unit is independently developed and upgraded, and the efficient collaboration between units will allow enterprises to obtain faster product iterations and re-engineering. Create a new, high-quality user experience.

With the in-depth advancement of enterprise digital business, more and more business digital units will be generated, and the huge scale of digital business will generate a lot of operation and maintenance work such as testing, deployment, and upgrading.

companyExperience
Netflix600+ microservice,and deploys 100 times per day
Uber1000+ microservice, and deploys several thousand times each week.
WeChat3000+ microservice, and deploys 1000 times per day

As described in the above table, from the perspective of typical cloud-native applications deployed by Uber and WeChat, there are thousands of deployments per day. Under this scale of digital business, operations such as operation and maintenance and publishing are performed manually, which is very inefficient and requires a huge workload. Therefore, automation is a must-have capability for cloud-native applications. O&M operations such as deployment, upgrade, system expansion, and shrinkage all need to be automated.

The value that cloud-native applications bring to enterprises

The value that cloud-native applications bring to enterprises is mainly reflected in reducing costs, improving efficiency, and accelerating business innovation.

From an economic point of view, in the second stage, when enterprise application software is migrated from local to cloud, if the establishment of software architecture is also adopted, its digital expenditure will increase significantly. Because the computing power cost per unit time on the cloud is actually higher than that locally. If application software wants to run more economically on the cloud, it needs to have the feature of running on demand. Cloud-native applications can automatically adjust the size of the cluster according to the specific needs of the business. For example, in Uber's business, during the peak period of car usage, Uber will dynamically expand the cluster to involve more computing resources to support user requests. When car usage is low, Uber can quickly release computing resources and return computing resources to cloud vendors. Compared with before, it is necessary to install business peaks and purchase computing resources in the local computer room. Cloud-native applications only need to pay according to volume, which greatly reduces the cost of digital enterprises.

Because most cloud-native applications adopt the microservice architecture and have the ability of continuous delivery and integration. This allows for largely decoupled business unit dependencies. Each digital business unit can be independently developed, released, and upgraded. This brings great flexibility to the business of the enterprise and greatly accelerates the speed of business iteration. For example, the update period of a traditional website may be once a month. However, after adopting the cloud-native architecture, because of the use of technologies such as automated integration and deployment, it can be updated once or even several times a day. This increase in business iteration speed allows digital enterprises to provide a better user experience than traditional enterprises.

· 4 min read

Using Cloud infrastructure definitely costs money. It is best practice to keep track of your operating cost while running different services on the Cloud regardless of the Cloud Provider. In the article, I will talk about a particular Cloud Provider; AWS. I assume you are familiar with this Cloud Provider or at least have some knowledge about them. I will focus on a particular service they offer called AWS Billing which in plain terms is used to keep track of the cost incurred when you use AWS services. Let’s talk more about it in the next section.

Table of content

AWS Billing

With the help of the Amazon Billing console, you can manage your consolidated billing if you're a member of an AWS Organization, pay your AWS bills, track and report your AWS costs and consumption, and arrange your AWS usage and costs.

The Billing console works closely with the AWS Cost Management console. Both can be used to manage your spending in a comprehensive way. You can manage your ongoing payments and the payment methods linked to your AWS account using the billing console's tools.

When you register for an AWS account, Amazon Web Services automatically charges the credit card you provided. You can change the credit card AWS will use to make charges by viewing or updating your information at any time.

Next, we will talk about AWS Budgets, and why we need it

AWS Budgets

Source: https://www.reddit.com/r/ProgrammerHumor/comments/qbx03g/better_turn_off_aws_before_you_get_a_huge_bill/

Most times, we accidentally run some services like an EC2 instance and forget to turn it back off. It could even run for a month or months before we realize we have incurred a huge cost. This is why Budgets are very important. With AWS Budgets, you can set a threshold for your expenses and when it gets to that limit, AWS will alert you about it. You can then log in to your AWS Console and shut down such services.

How To Set Up AWS Budgets

  1. Log in to your AWS Console and search for Billing, Click on it and it will open the AWS Billing Page

  2. On the Tab to the left, select Budgets and then click Create Budget

  3. Select your budget type. Select Customize and in the next section, select Cost Budget, scroll down and click Next

  4. In the next step, - Set your Budget name, - The budget period (Daily, Monthly, Quarterly, Yearly), - Select the Budget renewal type you prefer (Recurring budget, Fixed budget), - Set your start month, - Set the budgeting method (Fixed, Planned, Auto-Adjusting) - Select your budget amount which will prompt a notification when it is exceeded - Finally, select All AWS Services in Budget scope You should see a page like the screenshot below

  5. Now, we will configure our alert system according to our set budget. We can set our alert based on percentage or actual value. If set as percentage, we can set a certain percentage level has to reached before we receive an alert. For actual value, we can set the actual amount for an alert trigger. In this example, I have set a budget of $5 and 80% threshold before I receive an alert. Next, I will set an email to receive the notification. AWS also offers other means of notification like Amazon SNS Alerts and AWS Chatbot Alerts.

  6. Review your configurations and click Create Budget. If successful, you will see your budget created in the Budget Home

If you see this, congrats! You have successfully set up a budget to notify you when you exceed the threshold of budgeted amount.

Vanus Connect Extra Feature

Setting up your budget is very important as a developer or business. In this article we have used Email to receive the notifications. What if we want to receive the notification in our Slack Channel? We can easily do that with Vanus Connect. Vanus Connect provides out-of-the-box Connectors that enable you to integrate with popular services or applications without writing codes. With a simple configuration file, Vanus Connectors connect to the external service and move data in and out of that service on behalf of user applications, allowing you to focus on your business logic. I have written an article on how you can receive your AWS Billing Reports on a Slack Channel using Vanus Connect. You can check it out here.

Conclusion

Setting budgets for your business is very crucial, you need to monitor resource usage and be informed when you exceed your threshold. AWS Budgets helps you do that.

· 11 min read

Welcome to my article on MySQL to S3 pipeline using Vanus! In this post, we'll explore how you can set up a reliable and scalable pipeline to export data from your MySQL database to Amazon S3 using Vanus, a powerful data integration platform.

If you're using MySQL to store critical data for your business, it's important to ensure that you have a backup and archiving solution in place. Storing data in S3 provides many benefits, including durability, scalability, and cost-effectiveness. With Vanus, you can easily set up a pipeline to extract data from your MySQL database and write it to S3.

By the end of this blog post, you'll have a solid understanding of how to set up a MySQL to S3 pipeline using Vanus, and you'll be equipped with the tools and knowledge you need to ensure that your data is backed up and archived in a reliable and scalable manner. So let's dive in!

· 8 min read

A Vanus connector is a software component that allows different systems or applications to communicate with the Vanus event platform. Connectors enable data to be easily and efficiently exchanged between different platforms, making it possible to integrate and automate business processes.

Now, Vanus community is looking for developers helping us contribute more connectors and improve the quality of existed ones.

In order to do that, we provide two CDKs(Connector-Development Kits) and code templates to use them so developers can avoid starting from scratch.

This article introduces the definition of Vanus Connect, some tools to help users develop new connectors, and how to use these templates to write a connector.